Inserting and Retrieving data in Grid View using Entity Framework
1. Open Visual studio 2010. Then open File, New and Project from
options. Select web from Installed templates. Click on ASP.NET Web Application, name it as GVApplication and press OK
2.
Visual Studio 2010 will automatically create some HTML
code. Click on root folder in Solution
Explorer and delete the default.aspx. then add two new Web Forms and name them as AddData.aspx
and ShowData.aspx
3.
Open AddData.aspx
and add the following code.
<body>
<form id="form1" runat="server">
<div>
<table>
<tr>
<td>
Name:
</td>
<td>
<asp:TextBox ID="NameTxtBx"
runat="server"></asp:TextBox>
</td>
</tr>
<tr>
<td>
Address:
</td>
<td>
<asp:TextBox ID="AddressTxtBx"
runat="server"></asp:TextBox>
</td>
</tr>
<tr>
<td>
Email:
</td>
<td>
<asp:TextBox ID="EmailTxtBx"
runat="server"></asp:TextBox>
</td>
</tr>
<tr>
<td>
<asp:Button ID="SubmitBtn"
runat="server"
Text="Submit"
OnClick="SubmitBtn_Click"
/>
</td>
<td>
<asp:HyperLink ID="ShowDataLink"
runat="server"
Text="Show
Data" NavigateUrl="~/ShowData.aspx.cs"></asp:HyperLink>
</td>
</tr>
</table>
</div>
</form>
</body>
4.
Now
Open Sql Server and Create a new Data Base as RecordDB. Create a table as EmployeeData
and add four fields EmployeeID, Name,
Address, Email. Set EmployeeID as a primary key of the table.
5.
Now
in right Click on Root folder in Solution explorer and Select Data from Installed templates panel and select ADO.NET Entity Data Model, name it as
EmployeeModel and Click Add

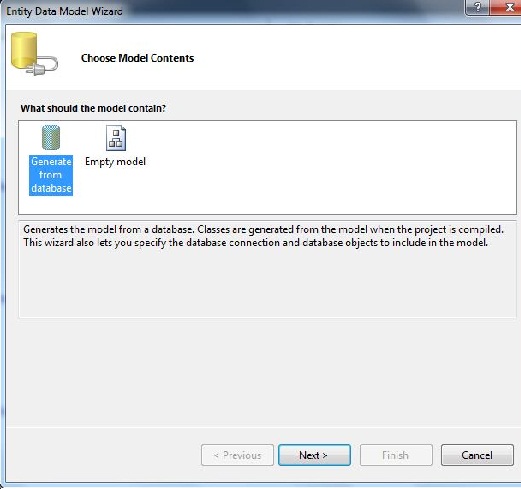
6.
Select
Generate from DataBase and Click Next.
7.
In
the next step, select New Connection then
a new window will appear. Write your Data base Server Name and select your authentication method. In Select or Enter Database name select RecordDB. Click OK and previous window
will be appear. Click next and following window will appear.

8.
Check
Tables option as we didn’t created
View and Stored procedures yet. Click Finish.
9.
Open
the AddData.aspx.cs and in SubmitBtn_Click add following code.
protected
void SubmitBtn_Click(object
sender, EventArgs e)
{
RecordDBEntities
db=new RecordDBEntities(); //CREATE DATABASE
OBJECT
EmployeeData
dbTable = new EmployeeData(); //CREATE TABLE
OBJECT
dbTable.Name = NameTxtBx.Text;
dbTable.Address =
AddressTxtBx.Text;
dbTable.Email = EmailTxtBx.Text;
db.EmployeeDatas.AddObject(dbTable);
db.SaveChanges();
}
12. Debug
the project and add some values
13. To
retrieve the values from Data base, open the ShowData.aspx, switch to design view and
GridView from toolbox.

14. Drag EntityDataSource and drop it at bottom
of GridView.

15.Select EntitiDataSource and Click Configure Data Source.
In the new
window select RecordDBEntities from Named Connection and Click Next.

16. Select
EmployeesDatas from EntitySetName and Check Name, Address and Email to display in
GridView. Click Finish.

17. Select
GridView and in Choose Data Source option select
EntityDataSource1

18. Debug
the project, enter some values in AddData.aspx
page and click show data link to see
the result in GridView


No comments:
Post a Comment