Migration from SharePoint 2010 to SharePoint 2013

Saturday, 15 December 2012

Here is quick overview of the migrating from sharePoint 2010 to sharepoint 2013 by content attach method.

Step 1:  First of all create a new webapplication on sharepoint 2013 server.

Step 2: If you have farm solutions deployed on you sharepoint 2010 sever, deploy them on sharepoint 2013 server. You can deploy the solution using the following power-shell command:
         
       Add-SPSolution -LiteralPath < SolutionName.wsp>

     Install-SPSolution -identity <SolutionName>

Step 3: Now open the SQL management studio in sharepoint 2010 environment and restore the content database.


Step 4: Create a new DataBase on SharePoint 2013 and restore the database environment using SQL server management studio. Its a very simple task and can be achieved by few clicks.

Step 5: Once the database is restored check the database to make sure the new environment has all the required component that the sharepoint 2010 site was using. Run Test-SPContentDatabase in powershell the perform the check operation.


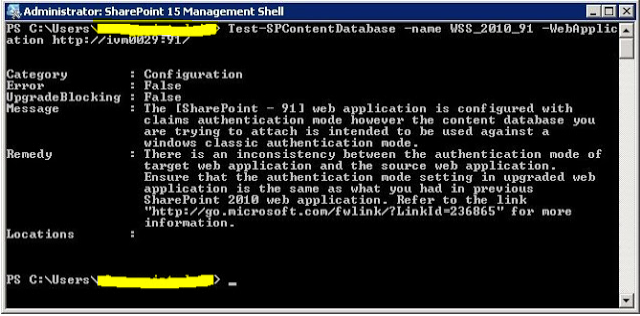
After running the command may be you get some errors like missing assemblies and missing webaprts. here is very good blog to get rid of such error and cleaning the unwanted feature before migration.

step 6: Now we are ready to attach the database to newly created web application. Run the powershell command that will perform the attach operation.


Step 7: Once the Mount operation completes, open the Central admin and change the site collection administrators. It is necessary when you are working in different farms.

Browse the site, if you got any upgrade message on the top of the site, lets click on start now.

Once all this done, visit the site and check the SP15 look.


SharePoint 2013 (preview) Installation Issues

Monday, 12 November 2012

During my first installation of SharePoint 2013 (preview) on windows server 2012, i faced some issues. So, i like to share with you the solutions of the issues.

1. Failed to connect to the configuration database


You might face this error if you choose stand alone installation option.

Solution:
If you have Sql server management studio install, then go to the .\SHAREPOINT-->Security-->Login-->Administartor-->rightclick and select Properties--> ServerRole--> check setadmin.

Then open the Sharepoint powerShell and execute the following command. 

psconfig.exe -cmd Configdb Create SkipRegisterAsDistributedCacheHost

Wait for the command to perform the 3 steps.


Then run the configuration wizard again.

2. Failed to create sample data 


This error cold be occur in step 8 of the configuration. Ignore this exception as central administrator is already created. Just finish the wizard and go to central administrator and check the web application is successfully created.


Inserting and Retrieving data in Grid View using Entity Framework

Friday, 24 February 2012

Inserting and Retrieving data in Grid View using Entity Framework

1.    Open Visual studio 2010. Then open File, New and Project from options. Select web from Installed templates. Click on ASP.NET Web Application, name it as GVApplication and press OK
2.                  Visual Studio 2010 will automatically create some HTML code. Click on root folder in Solution Explorer and delete the default.aspx. then add two new Web Forms and name them as AddData.aspx and ShowData.aspx
3.                  Open AddData.aspx and add the following code.

<body>
    <form id="form1" runat="server">
    <div>
        <table>
            <tr>
                <td>
                    Name:
                </td>
                <td>
                    <asp:TextBox ID="NameTxtBx" runat="server"></asp:TextBox>
                </td>
            </tr>
            <tr>
                <td>
                    Address:
                </td>
                <td>
                    <asp:TextBox ID="AddressTxtBx" runat="server"></asp:TextBox>
                </td>
            </tr>
            <tr>
                <td>
                    Email:
                </td>
                <td>
                    <asp:TextBox ID="EmailTxtBx" runat="server"></asp:TextBox>
                </td>
            </tr>
            <tr>
                <td>
                    <asp:Button ID="SubmitBtn" runat="server" Text="Submit" OnClick="SubmitBtn_Click" />
                </td>
                <td>
                    <asp:HyperLink ID="ShowDataLink" runat="server" Text="Show Data" NavigateUrl="~/ShowData.aspx.cs"></asp:HyperLink>
                </td>
            </tr>
        </table>
    </div>
    </form>
</body>


4.                  Now Open Sql Server and Create a new Data Base as RecordDB. Create a table as EmployeeData and add four fields EmployeeID, Name, Address, Email. Set EmployeeID as a primary key of the table.
5.                  Now in right Click on Root folder in Solution explorer and Select Data from Installed templates panel and select ADO.NET Entity Data Model, name it as EmployeeModel and Click Add


6.                  Select Generate from DataBase and  Click Next.


7.                  In the next step, select New Connection then a new window will appear. Write your Data base Server Name and select your authentication method. In Select or Enter Database name select RecordDB. Click OK and previous window will be appear. Click next and following window will appear.


8.                  Check Tables option as we didn’t created View and Stored procedures yet. Click Finish.
9.                  Open the AddData.aspx.cs and in SubmitBtn_Click add following code.

        protected void SubmitBtn_Click(object sender, EventArgs e)
        {
            RecordDBEntities db=new RecordDBEntities();  //CREATE DATABASE OBJECT
            EmployeeData dbTable = new EmployeeData();   //CREATE TABLE OBJECT
            dbTable.Name = NameTxtBx.Text;
            dbTable.Address = AddressTxtBx.Text;
            dbTable.Email = EmailTxtBx.Text;

            db.EmployeeDatas.AddObject(dbTable);
            db.SaveChanges();
           
        }

12. Debug the project and add some values
13. To retrieve the values from Data base, open the ShowData.aspx, switch to design view and
GridView from toolbox.


14. Drag EntityDataSource and drop it at bottom of GridView.


15.Select EntitiDataSource and Click Configure Data Source.

In the new window select RecordDBEntities from Named Connection and Click Next.


16. Select EmployeesDatas from EntitySetName and Check Name, Address and Email to display in GridView. Click Finish.


17. Select GridView and in Choose Data Source option select EntityDataSource1


18. Debug the project, enter some values in AddData.aspx page and click show data link to see the result in GridView